Migrate Windows Server 2012/2016/2019
Activate your Acronis Cyber Protect Account
As a first step, enable the Acronis cyber protect from portal.
How to enable
To enable the product:
Login to portal
Go to marketplace
Select Acronis
Click on manage
Order the access by clicking on Enable on the next step

After a few minutes, you will receive a mail that contains your login and activate Acronis account option.

Use this link cloud.acronis.com to login to your Acronis Cyber Protect.

Download and install Acronis Agent
To download the Acronis Cyber Protect Agent, follow these steps.
Go to the Devices then All device
Click on Add
Select Windows server

Transfer the download to your Windows server (using a remote desktop client) or you can copy the download link and download the agent directly to your server.
Start the Installation
Click on Install to start the installation.

Click on Show registry info to

Use this code to register your instance in the Acronis web portal.

Enter the code in the Regestration via code section, which you can find by scrolling down in the Add devices.

It may take a few minutes for your instance to show up in the Acronis portal.
Install the Exoscale Command-line Interface on Your PC or Another Server
Install the Exoscale CLI. You can view our documentation on the CLI for more details and configuration.
Create an IAM key
Login to Exoscale Portal
Click on
IAMSelect
KEYSthenADD

Save the key and the secret. Please do not share the IAM key with third parties.
Enter the command exo config in the CLI. You will now be guided through the CLI configuration, where you need to enter the key and secret and name of IAM-key you just created in the Portal.
Create a New Instance using the Exoscale portal
- Log in to the Portal.
- Go to
COMPUTE, thenINSTANCES. - Click on the
ADDbutton to the top right of the header. - For the Template, select Windows Server 2022 or 2025.
- Note that your disk space should be at least the same size on Exoscale as on your old server.
- Your hostname should be the same as on your old server as well.
While setup of the firewall on Exoscale is not in the scope of this guide, you can find more information in our documentation section on Security Groups.
You can use the default Security Group or create your own. To configure the firewall correctly, be sure to allow access via RDP.
In addition, the following ports must be enabled for the transmission of data from Acronis:
Ingress TCP 443, 7700-7800, 44445, 8443.
Here you can see an example of a correct configuration:

Starting the New Server on Exoscale using Exoscale CLI
Enter the following command on the CLI to create a new instance, adjusting the information accordingly:
exo c i create acronis-instance --zone ch-gva-2 --instance-type standard.medium --template "Windows Server 2025" --security-group default --ssh-key ssh-key --disk-size 60
In this example, we see:
- The hostname of the server (
acronis-instance) - The name of the security group (
default) - The type of the new server (
standard.medium) - The ssh key for the new server (
ssh-key) - The zone (
ch-gva-2for Geneva) - The template for the new server (
Windows Server 2025) - The disk size in GB - Which depends on the existing server; at least the size of the disk to restore with a little buffer.

Backup an instance
Use this option only if you don’t have a backup of your instance.
How to backup an instance
Select the Devices then All devices from the left-hand menu.
Under your instance name, select the backup option.
Choose the right plan.
Finally, click on the Run Now button to start the backup process.

Installing Acronis Backup Agent on the Exoscale Windows Instance
- Please follow the same procedure as before when installing Acronis on the new Exoscale server.
- You do not need to activate a backup plan for this instance.
- In the Acronis portal, go to All Devices and perform a restore from your old instance to the Exoscale instance (your old instance is the one with status OK).
Recovering the backup
Recovering the backup on the original server
You can recover either the entire server or a specific files/folders.
Use cases
Use recover the entire machine when the original server is operational but the files or folders have been lost, and you don’t have a separate backup for just those items.
Use recover File/folder when the original server is functioning and the file/folder has been lost but a backup for that file or folder exists.
How to restore the entire machine or file/folder
- Double click on the backup you want to restore
- Click on Recover

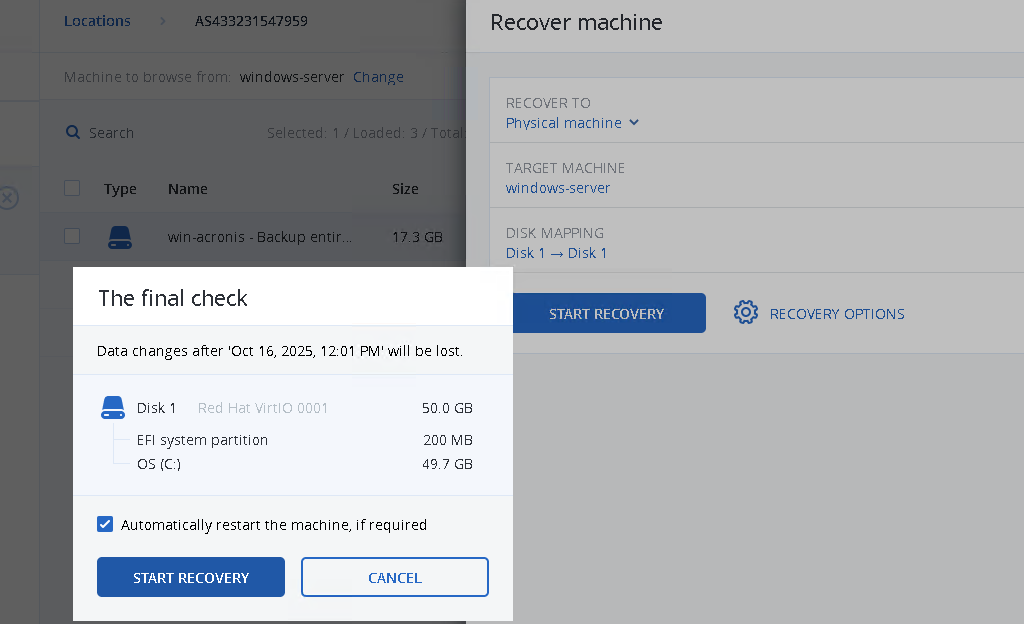
- Choose the correct option: Entire machine or Files/Folders and start the recovery.

Optional: Add the IP Addresses column to distinguish between your instances, and select your Exoscale instance as the destination.
- You do not need to change any other settings.
- Select the Exoscale target server and disk here.
- Note: If your original system has two partitions, Disk2 of the existing server will be restored in one of the next steps, skip the message in the Acronis portal which indicates this.
Recovering the backup on a new server
Use this option when the origianl server is no longer available and you need to recover the backup on a new windows server.
Requirements for the new server
- The new server must have at least the same disk size as the original server.
- It is recommended that the new server has a larger disk size to ensure sufficient storage capacity.
How to recover
Importing the Drivers
Boot your Exoscale instance into “netboot-efi” mode to deposit required VirtIO drivers into the recovery using following command:
exo c i start --rescue-profile=netboot-efi <servername>Open Portal again and scroll down to Windows:

Select Base URL and enter the following URL:
http://sos-de-muc-1.exo.io/windows-recovery-image/w2k19

Go to Load Microsoft Windows Installer and press enter.

Click on Next.

Click on Repair your computer.

Now click on Troubleshoot and then Advanced options.

Then click on Command Prompt.

Add the required drivers to your Windows instance. Enter the following command:
dism /image:C:\ /add-driver /driver:X:\drivers\vioscsi.inf
Then enter this command:
dism /image:C:\ /add-driver /driver:X:\drivers\viostor.inf
Lastly, install NetKVM with the following command:
dism /image:C:\ /add-driver /driver:X:\drivers\netkvm.inf
Exit the console with the exit command and click on Turn off your PC.

You can then restart your instance with the Portal.

Login to Acronis Cyber Protect from new server
- Select the backup from backup storage.
- Double click on the backup then you can choose the type of backup and the new machine.
Select the machine where you want to do the recovery.
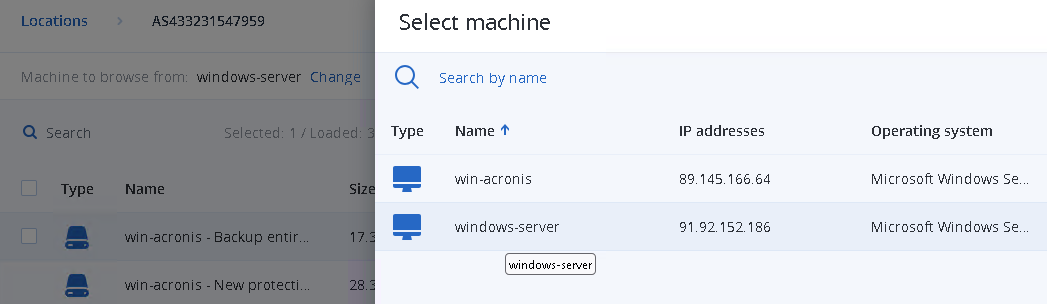
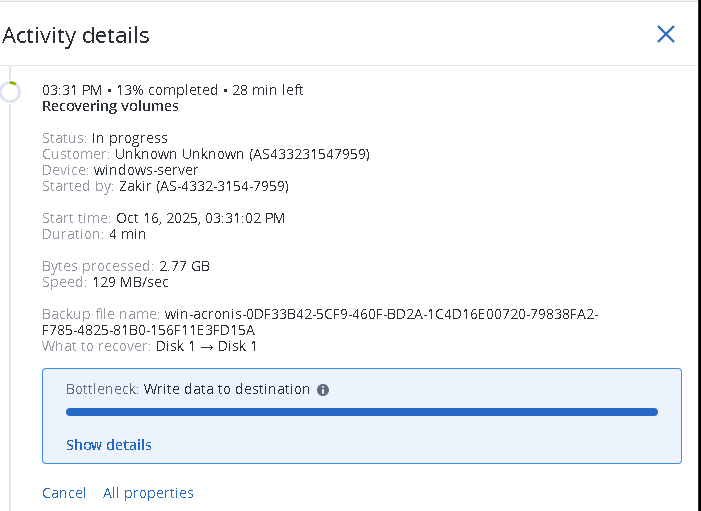
Start the recovery process
Remove the Server from Acronis Portal
- Highlight both servers and click Delete button.

Exchange the Windows Product Key (optional)
Lastly, the product key on the new Windows server must be changed to Exoscale. This can be done directly in Settings, then Update and Security then Activation.
Please request the product key from our support team at support@exoscale.com or directly in the Portal under SUPPORT.
Troubleshoot recovery process issues
The following problems may occur during the recovery.
Access denied
While performing the recovery, repeated “Access denied” errors occurred.
Troubleshooting actions
- Select Retry sevral times and waited for 15 minutes each time but nothing changed.
- Attempted Ignore and Ignore all options which did not resolve the issue.
- Powered off all the machines and rechecked them after several hours.
Outcome
- Login using the new server’s credentials failed, the system was accessible using the original server’s password.
- Compared the recovered server with the original server and confirmed that all the files/folders matched.
- The new drive and its files/folders were correctly restored on the recovered server.
Can’t find Viostor.sys driver
During a separate recovery attempt, the system displayed an error indicating the viostor.sys driver could not be found.
Action taken
- Selected the Ignore and Ignore all but the process did not continue.
- Powered off all the machines and rechecked them after several hours.
Outcome After restarting, the recovery process should be successfull and after compared both servers, all the files/folders matched.


