SKS Load Balancer and Ingress Controller
Kubernetes spans an internal network across all nodes automatically. Your pods and containers are reachable through a private IP address inside the cluster. To route traffic from the outside, you need in most cases a load balancer and optionally an ingress.
Prerequisites
As a prerequisite for the following documentation, you need:
- An Exoscale SKS cluster
- Access to your cluster via kubectl
- Basic Linux knowledge
If you don’t have access to a SKS cluster, follow the Quick Start Guide.
Note
For Network Load Balancers (or NLBs) to be created automatically, you need the Exoscale Cloud Controller Manager (or CCM) add-on installed in your cluster. By default, the CCM should come automatically installed. In the CCM documentation, you can also find the reference on service annotations which you might need for your service or ingress configuration.
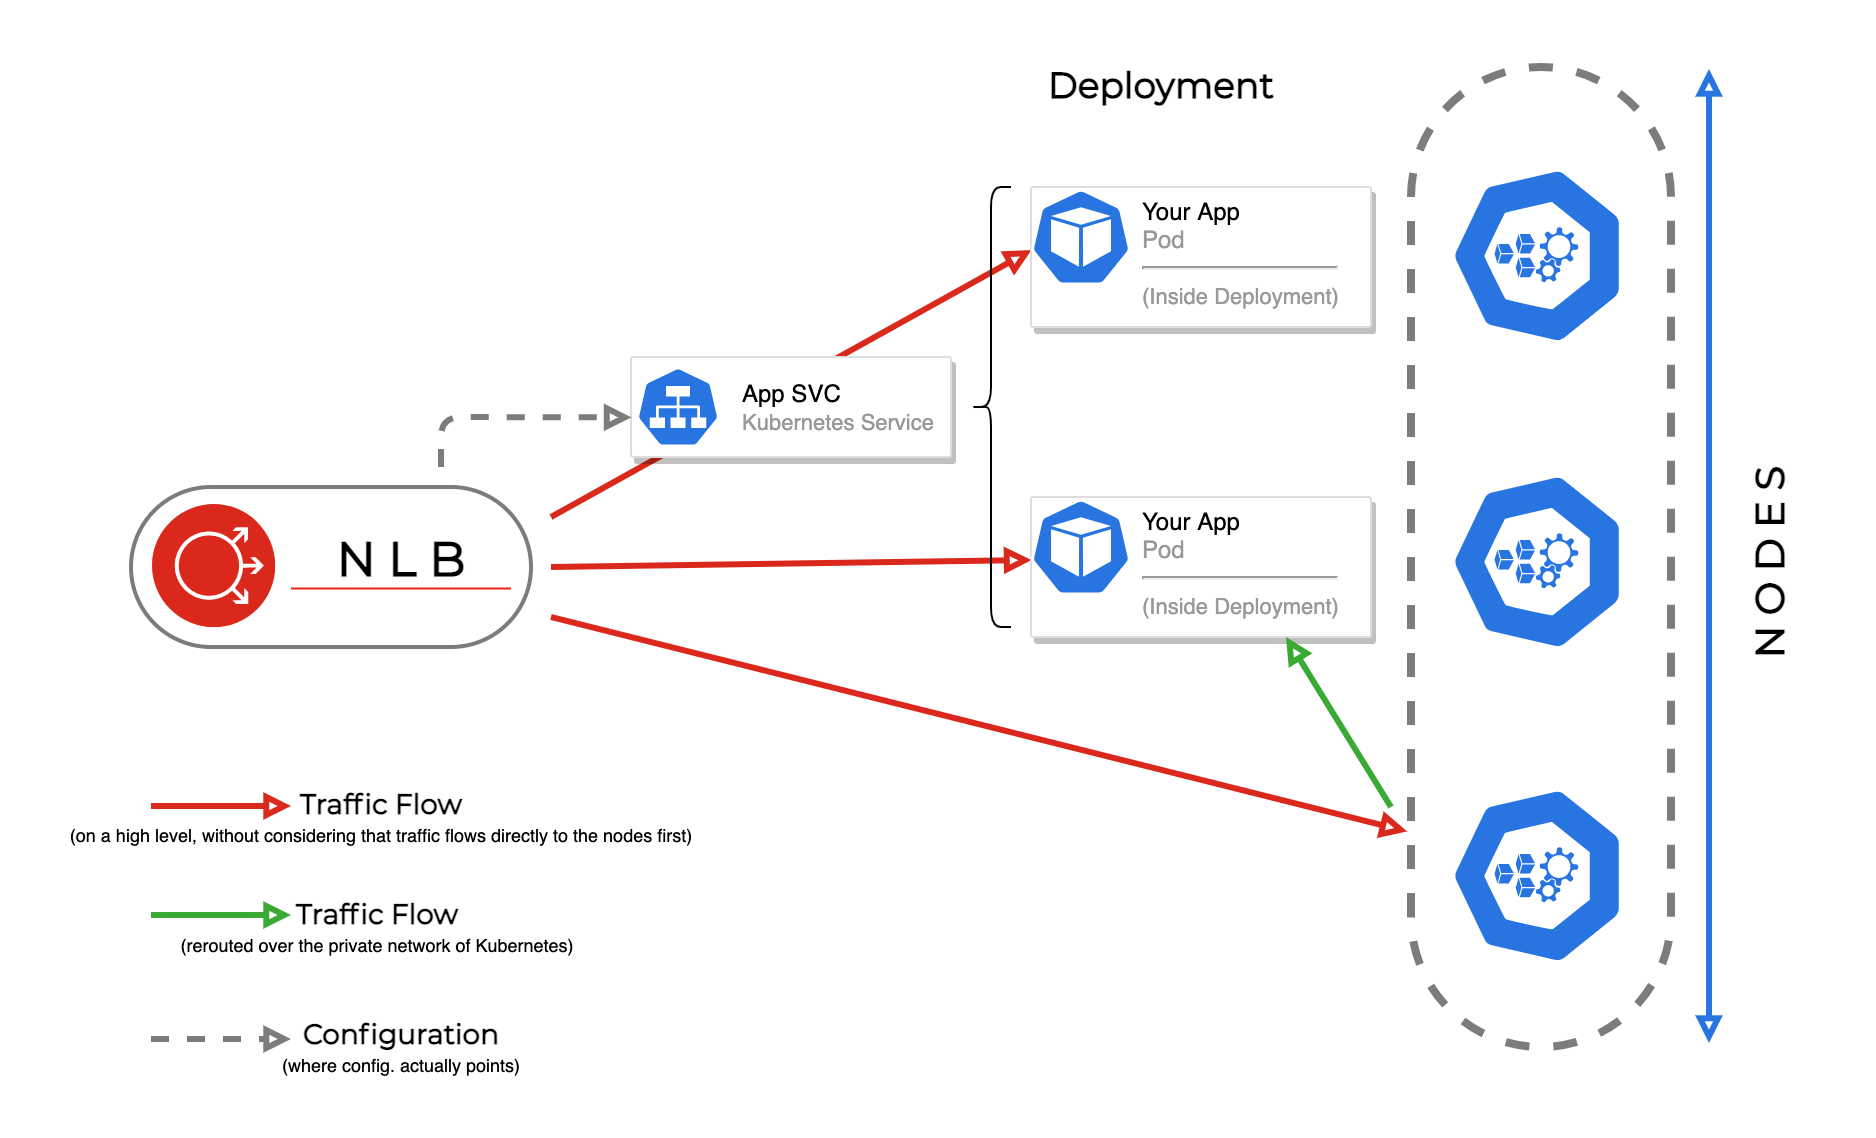
Exposing a single service with an Exoscale Load Balancer
To expose a single pod or a deployment, you need to create a service of type LoadBalancer.
The following example creates a deployment named hello, which consists of 3 hello-world pods/containers. This could be your web application:
kubectl create deployment hello --image=nginxdemos/hello:plain-text --replicas=3
As there is no service yet defined, you can only access the webpage of the containers via the respective internal IP inside the cluster. Use kubectl get pods -o wide, if you want to take a look at the created pods.
To allow access from outside the cluster, you can expose the deployment with a load balancer:
kubectl expose deployment hello --port=80 --target-port=80 --name=hello-service --type=LoadBalancer
This will create a service named hello-service, exposing the deployment hello. --port specifies the port on where the LoadBalancer should listen, which should be port 80 in most cases. --target-port specifies the target port that the container exposes or provides.
As we specified the flag --type=LoadBalancer, Kubernetes will talk over the CCM to Exoscale, and create a Network Load Balancer (or NLB). To get its IP address, you can use kubectl get svc:
> kubectl get svc -n default
NAME            TYPE           CLUSTER-IP       EXTERNAL-IP       PORT(S)        AGE
hello-service   LoadBalancer   10.102.248.197   194.182.170.158   80:30665/TCP   2m3s
kubernetes      ClusterIP      10.96.0.1        <none>            443/TCP        52m
You can also see your load balancer in the Portal under Compute in the main navigation under the Load Balancers section, or use the CLI with the exo compute load-balancer and exo compute load-balancer show commands.
In this case, the web application would be now reachable via 194.182.170.158. The service LoadBalancer will automatically route and balance traffic to your pods.
Note
Deleting a cluster will not always delete the Network Load Balancers created by a Kubernetes service. Make sure to check your load balancers in the Portal or CLI after deleting a SKS cluster, and delete the load balancers if necessary. When the annotation exoscale-loadbalancer-external is set to true (see the example below), the load balancer will never be automatically deleted.
You can also specify this setup as a manifest, where you can define additional annotations for the LoadBalancer service:
apiVersion: apps/v1
kind: Deployment
metadata:
  labels:
    app: hello
  name: hello
spec:
  replicas: 3
  selector:
    matchLabels:
      app: hello
  template:
    metadata:
      labels:
        app: hello
    spec:
      containers:
      - image: nginxdemos/hello:plain-text
        name: hello
---
apiVersion: v1
kind: Service
metadata:
  labels:
    app: hello
  name: hello-service
  annotations:
    # Uncomment if you want to use an already existing Exoscale LoadBalancer
    #service.beta.kubernetes.io/exoscale-loadbalancer-id: "09191de9-513b-4270-a44c-5aad8354bb47"
    #service.beta.kubernetes.io/exoscale-loadbalancer-external: "true"
    # When having multiple Nodepools attached to your SKS Cluster,
    # you need to specify then the ID of the underlying Instance Pool the NLB should forward traffic to
    #service.beta.kubernetes.io/exoscale-loadbalancer-service-instancepool-id: "F0D7A23E-14B8-4A6E-A134-1BFD0DF9A068"
spec:
  ports:
  - port: 80
    protocol: TCP
    targetPort: 80
  selector:
    app: hello
  type: LoadBalancer
You can find all annotations for the LoadBalancer service in the Exoscale CCM documentation.
Note
A Network Load Balancer can only route to one instance pool. If you have multiple nodepools attached to an SKS cluster, define which instance pool (underlying one of the attached nodepools) to route to via an annotation. Also, when a Kubernetes service points to a scheduled pod outside of its attached instance pool, it can still be reached, as Kubernetes automatically handles internal routing. However, this extra hop might result in less efficient traffic balancing.
When you have multiple services or websites, you can either create additional Network Load Balancers, or use an ingress in addition to the LB-service as explained in the next chapter.
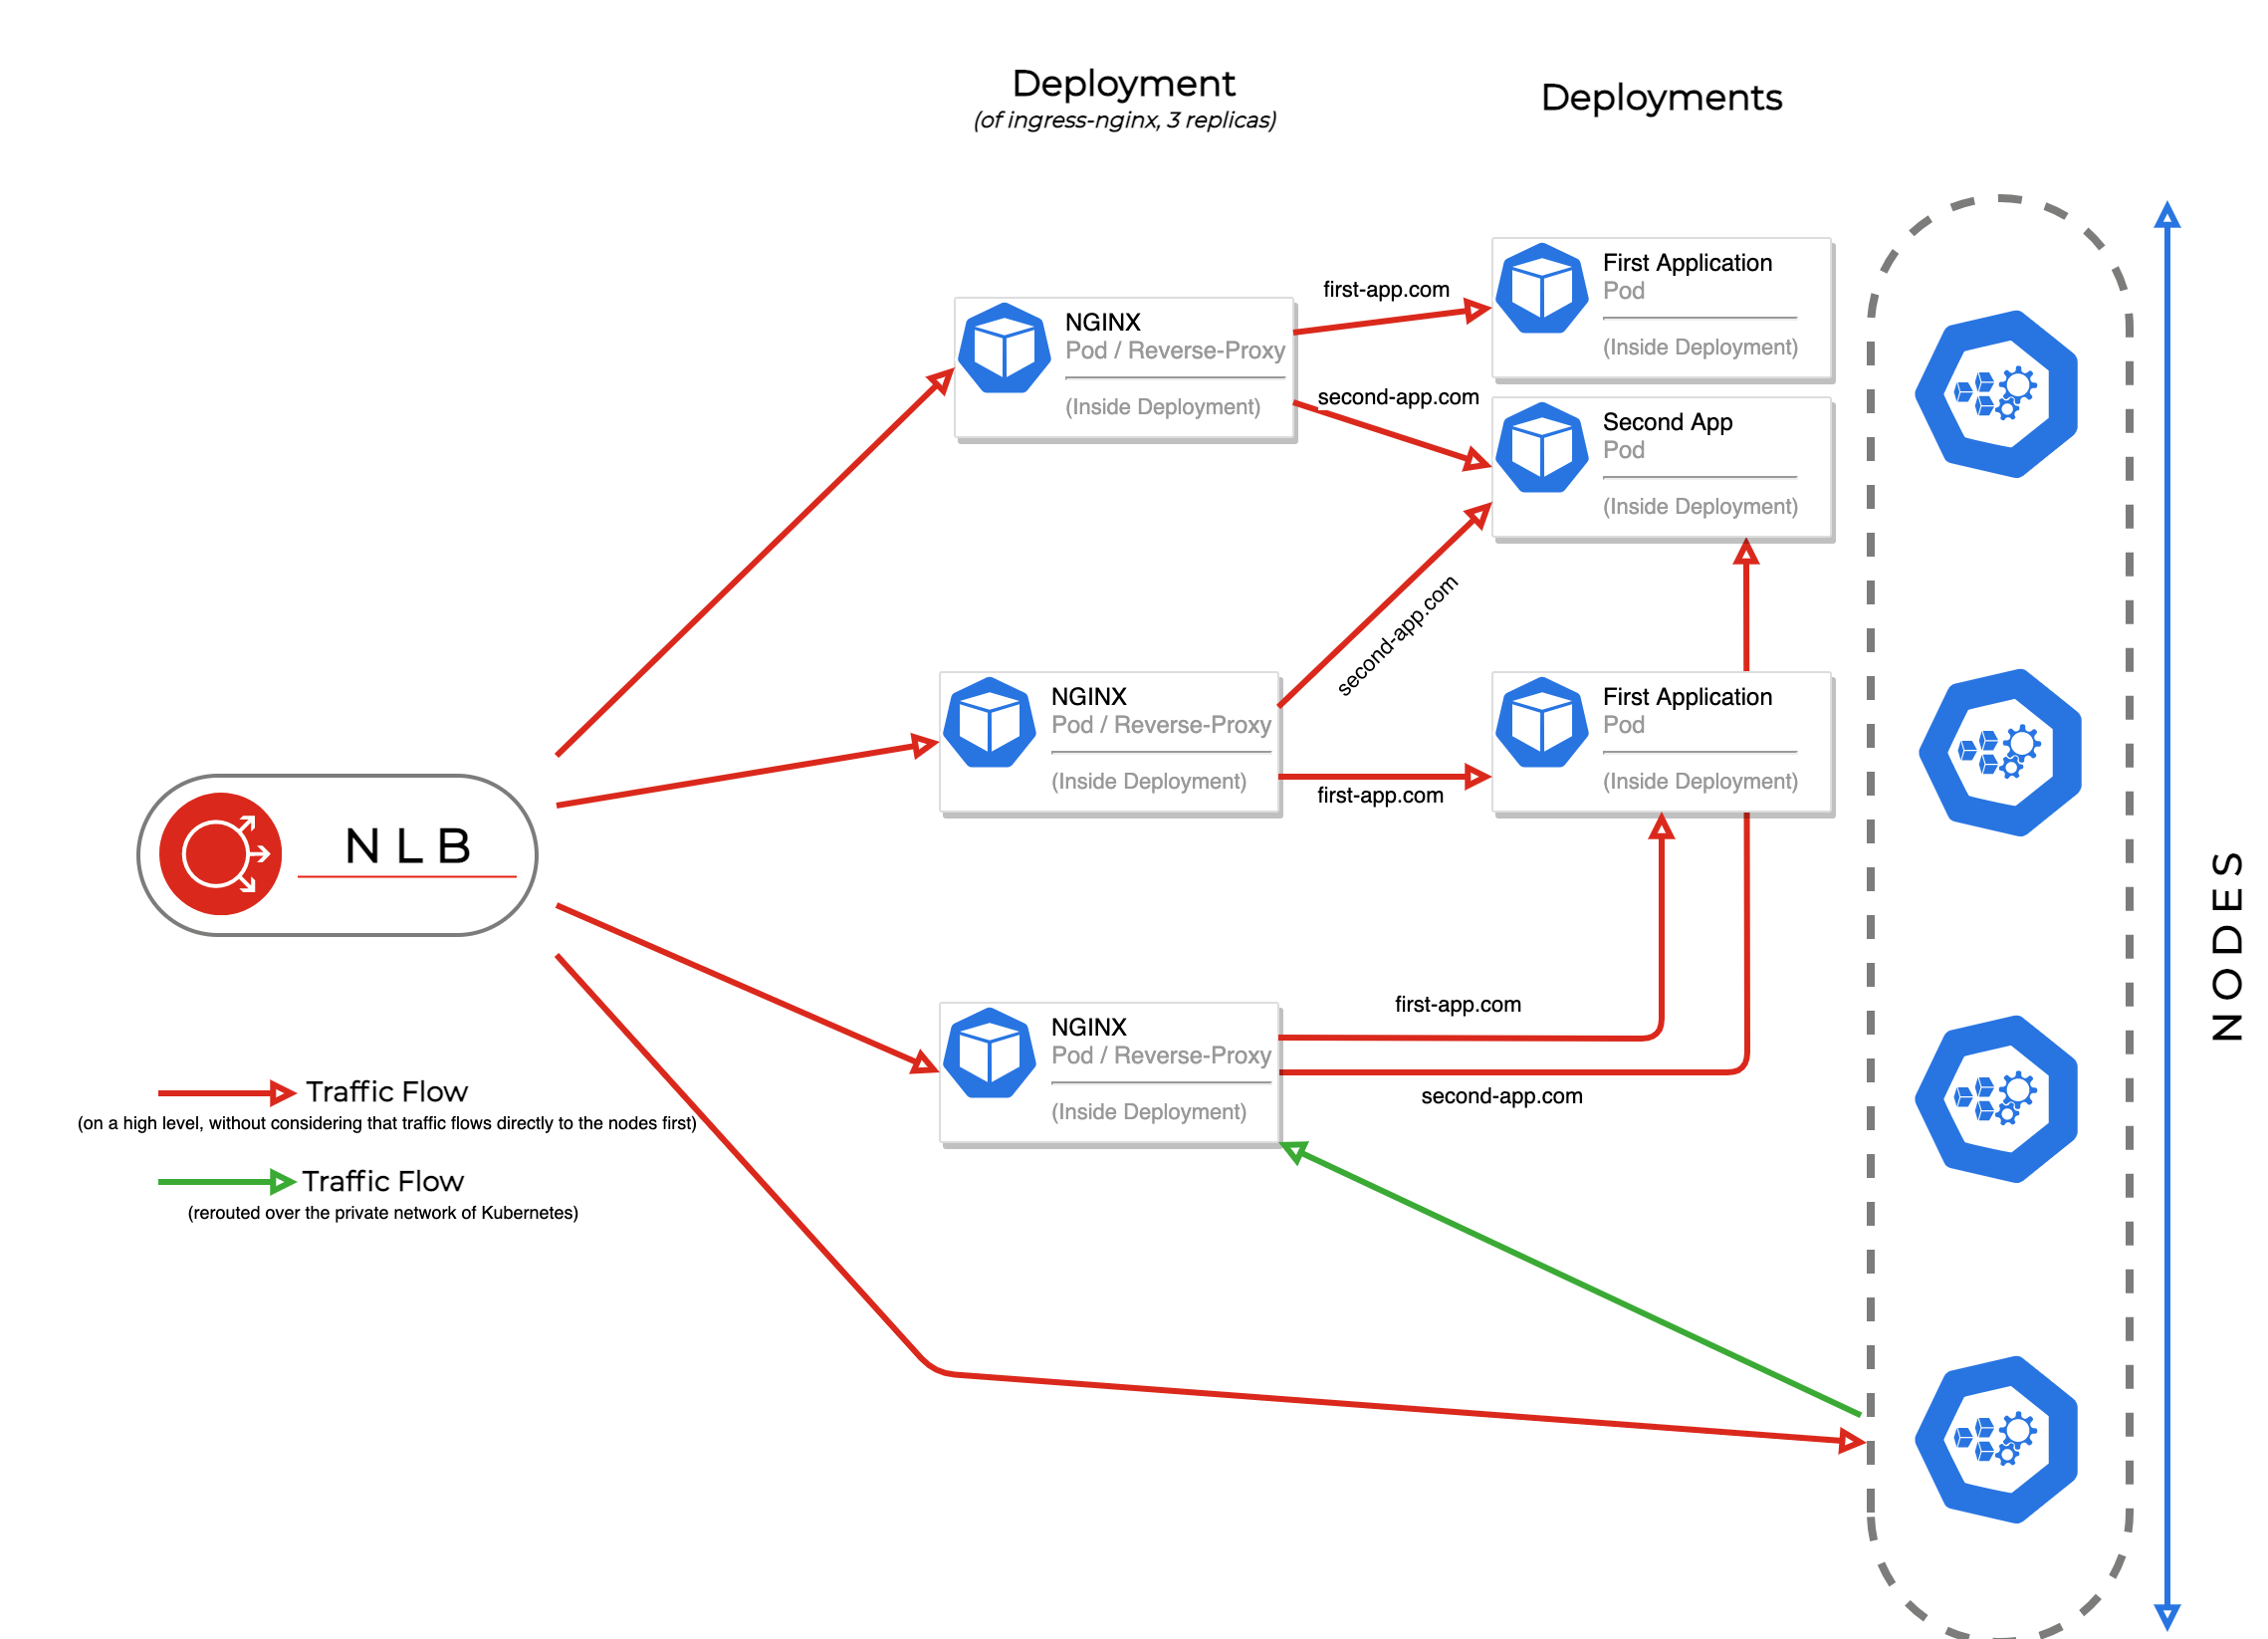
Using an Ingress to expose multiple websites
A Network Load Balancer only provides layer 4 (TCP) routing and cannot distinguish between different hostnames or website paths. To distinguish between the two, we need to enable layer 7 routing, we can point the NLB to a reverse proxy (or ingress) which is deployed on an arbitrary amount of nodes.
For defining routes, you create ingress resources. However, they have no effect without an ingress controller, which is a deployed reverse proxy. The next section explains on how to install the NGINX Ingress Controller.
Note
There are multiple solutions for ingress controllers available. Check the Kubernetes documentation for more information.
The next figure shows how the routing works with a combination of Network Load Balancer, NGINX Ingress Controller and deployments for different websites:
Exoscale Academy
Are you looking for general information on ingress and ingress configuration? Take a look the free SKS ADVANCED Course in our online academy.
Deploying ingress-nginx controller
Download the current manifest of ingress-nginx for Exoscale (You can also download the .yaml file directly).
To implement the routing, the manifest creates a DaemonSet ingress-nginx-controller, which creates a NGINX pod on either some or all nodes for routing.
Note
You can also search for kind: DaemonSet in the manifest and replace it with kind: Deployment (for example, for large clusters). Then you can scale the Deployment ingress-nginx-controller by yourself.
As this manifest creates a service of type LoadBalancer, depending on your setup, you will add custom annotations like we have done in the first section of this guide.
Save the manifest. Then apply the manifest with kubectl apply -f deploy.yaml.
Wait until the ingress controller pods have started, check with:
kubectl get pods -n ingress-nginx \
  -l app.kubernetes.io/name=ingress-nginx --watch
It should show Running for the controllers after a while:
ingress-nginx-controller-7b78df5bb4-c8zgq 1/1 Running 0 29s
Use ctrl+c on your keyboard to cancel the --watch command.
You are now ready to deploy ingress configurations. To get the IP of the LoadBalancer, you can use kubectl get svc -n ingress-nginx or check your load balancer information using the Portal or CLI.
Creating Ingress rules
You can now use an ingress rule to connect your applications with the Load Balancer.
Below is an example ingress rule. Save it to a file and apply it with kubectl apply -f rules.yaml:
apiVersion: networking.k8s.io/v1
kind: Ingress
metadata:
  name: ingress-myapp
  annotations:
    # This is important, it links to the ingress-nginx controller
    kubernetes.io/ingress.class: "nginx"
spec:
  rules:
  - http:
      paths:
      - path: /app1
        pathType: Prefix
        backend:
          service:
            name: hello
            port: # this is the port of the ClusterIP service
              number: 80
      - path: /app2
        pathType: Prefix
        backend:
          service:
            name: other-service
            port:
              number: 80
The example will route the path /app1 and /app2 to different backend services.
Note that the ingress must point to an internal ClusterIP service. For running this example, you can take the example deployment in the first section, and change type: LoadBalancer to type: ClusterIP. The address http://YOURLOADBALANCERIP/app1 will then route to the hello deployment.
You can also specify different hosts, either in the same ingress ruleset or via different manifests as in the following example:
apiVersion: networking.k8s.io/v1
kind: Ingress
metadata:
  name: ingress-myapp
  annotations:
    kubernetes.io/ingress.class: "nginx"
spec:
  rules:
  - host: "example.com"
    http:
      paths:
      - path: /
        pathType: Prefix
        backend:
          service:
            name: hello
            port:
              number: 80
---
apiVersion: networking.k8s.io/v1
kind: Ingress
metadata:
  name: ingress-otherapp
  annotations:
    kubernetes.io/ingress.class: "nginx"
spec:
  rules:
  - host: "example-otherapp.com"
    http:
      paths:
      - path: /
        pathType: Prefix
        backend:
          service:
            name: other-service
            port:
              number: 80
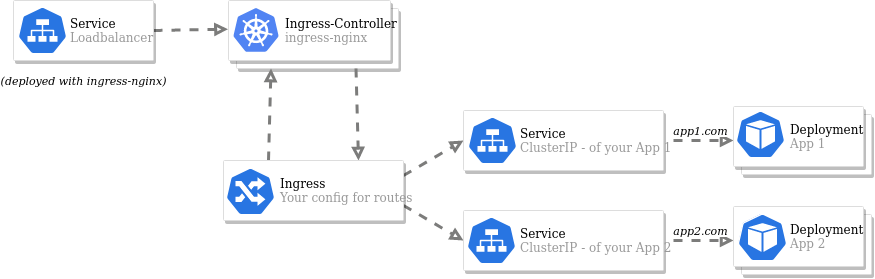
Use kubectl get ingress to list the rulesets that have been created. This command will also list the external IP address of the LoadBalancer.
The next figure shows how the objects or services of the whole configuration are interrelated:
Further links
- The Exoscale CCM documentation on integrating with Network Load Balancers.
- A breakdown of Exoscale Network Load Balancers.
- The Kubernetes documentation for LoadBalancer.
- sks-advanced-course: https://academy.exoscale.com/courses/course-v1:Exoscale+SKS300+R2023/about
- The Kubernetes documentation for Kubernetes Ingress.